You have probably run into it if you created SharePoint 2010 workflows using SharePoint Designer. The cool part of SharePoint 2010 is that it actually allows you to modify or copy the out-of-the-box workflows. The not so cool part is that the activities in SharePoint Designer are quite limited in their functionality.
For example, in the email activity that comes out of the box it is not possible to add attachments, nor does it allow you specify the From field.
Fortunately, using Visual Studio, we can upgrade the toolbox for SharePoint Designer activities to add more specialized activities that can then be used in the designer workflows.
Sure, it is possible to just create the workflow in Visual Studio, but to me, the hassle of creating a complete Visual Studio workflow, just because you want to change the From field does not make sense. It is not cost effective. SharePoint Designer workflows are powerful and should be part of the evaluation for any workflow solution. It has its limits, but also a lot of strengths.
In this post, I will show how to create a custom workflow activity for this purpose. To keep things simple, if possible using this subject, I will only allow for a single attachment. I will leave it up to you to update the activity with multiple attachments if you want to. Before I begin though, if you would like to just buy a lot of additional custom activities for SharePoint 2010, please take a look at the offerings from Nintex.
To build this feature, we will follow the following steps:
- Set up a standard SharePoint solution in Visual Studio 2010
- Define our ACTIONS file, which tell SharePoint and SharePoint Designer which activities I would like to include
- Define our SendMail class, which will implement the actions specified in the ACTIONS file
- Register our new custom action in the web.config using an eventreceiver (I will post a cool feature to do this easily in a later post)
- Package, deploy and test
Set up the solution structure
First, create a new Visual Studio solution using the SharePoint empty project template . Ensure that you have a key, so the resulting assembly is signed and deployable to the GAC. Then add a SharePoint Mapped folder, pointing to the following location:
Template\<yourlanguageLCID>\Workflow
Once done, add a file in this folder with the extension ACTIONS. You can call the file any way you want, but I used BoomCustomActivities.ACTIONS. Your solution should look like this now:

Define the ACTIONS file for our activity
We will now define which actions we will add to the toolbox. These will become available in the Actions tab on the Ribbon in SharePoint Designer. Populate the ACTIONS file with the following XML definition:
<?xml version=“1.0” encoding=“utf-8“?>
<WorkflowInfo Language=“en-us“>
<Actions Sequential=“then” Parallel=“and“>
<Action
Name=“Send email with attachment”
ClassName=“$SharePoint.Project.FileNameWithoutExtension$.SendEmailActivity”
Assembly=“$SharePoint.Project.AssemblyFullName$”
AppliesTo=“all”
Category=“Email actions“>
<RuleDesigner
Sentence=“Send email with attachment %1 to %2. Use %3 as the sender“>
<FieldBind Field=“AttachmentFileName” Text=“this file (url)” DesignerType=“TextArea” Id=“1“/>
<FieldBind Field=“To,CC,Subject,Body” Text=“these user(s)” DesignerType=“Email” Id=“2“/>
<FieldBind Field=“From” Text=“this user” DesignerType=“TextArea” Id=“3“/>
</RuleDesigner>
<Parameters>
<Parameter Name=“__Context” Type=“Microsoft.SharePoint.WorkflowActions.WorkflowContext” Direction=“In“/>
<Parameter Name=“__ListId” Type=“System.String, mscorlib” Direction=“In“/>
<Parameter Name=“__ListItem” Type=“System.Int32, mscorlib” Direction=“In“/>
<Parameter Name=“__ActivationProperties” Type=“Microsoft.SharePoint.Workflow.SPWorkflowActivationProperties, Microsoft.SharePoint” Direction=“Out“/>
<Parameter Name=“AttachmentFileName” Type=“System.String, mscorlib” Direction=“In“/>
<Parameter Name=“To” Type=“System.Collections.ArrayList, mscorlib” Direction=“In“/>
<Parameter Name=“CC” Type=“System.Collections.ArrayList, mscorlib” Direction=“Optional“/>
<Parameter Name=“Subject” Type=“System.String, mscorlib” Direction=“In“/>
<Parameter Name=“Body” Type=“System.String, mscorlib” Direction=“Optional“/>
<Parameter Name=“From” Type=“System.String, mscorlib” Direction=“In“/>
</Parameters>
</Action>
</Actions>
</WorkflowInfo>
Let’s discuss the contents. The WorkflowInfo node just indications this definition applies to Workflows. The Actions node defines how the text is build up in the workflow designer. For example, if used in a sequential action, the action will read <actiondescription> then. Nothing really interesting there. The real magic starts with the Action node. In there, the attributes Name, ClassName, Assembly, AppliesTo and Category define the name of the action in the actions menu, the class and assembly for the code, if it relates to list items, documents only or all, and the Category in which it is listed in the actions menu.
The RuleDesigner node specifies the text shown in the editor and related input parameters. The attribute Sentence specifies the sentence shown in the designer. You specify each parameter by a % followed by a number. %1 will point to the first parameter and so on. The parameters are specified using FieldBind attributes. The Text attribute substitutes the ‘%’ parameter indicator in the sentence in the designer. The Id attribute should match the order of the parameter.
The Parameters node and subsections define the parameters that will be passed into your custom activity class. Parameters obtained from the FieldBinding should exactly match the parameter names in the parameters section for them to be transferred to your code. You also specify whether your parameter is in or out and the type of the property, which is a .NET type. For more information on Workflow Action files, see MSDN.
So now we have our ACTIONS definition file. Let’s move on to the code itself.
Create the class for our activity
Add a new class to your project. Call the class SendEmailActivity as stated in the ACTIONS file. Have the class inherit from the System.Workflow.ComponentModel.Activity class. That is the easy part. Now for each of the parameters we stated in the ACTIONS file, we need to create properties and ensure that they map. First do the Workflow Context properties. They use a DepencyProperty to map the property in the class to the parameter stated in the ACTIONS file. See below code snippet.
#region [ Workflow Context Properties ]
public static DependencyProperty __ContextProperty = DependencyProperty.Register(“__Context”, typeof(WorkflowContext), typeof(SendEmailActivity));
[ValidationOption(ValidationOption.Required)]
public WorkflowContext __Context
{
get
{
return ((WorkflowContext)(base.GetValue(__ContextProperty)));
}
set
{
base.SetValue(__ContextProperty, value);
}
}
public static DependencyProperty __ListIdProperty = DependencyProperty.Register(“__ListId”, typeof(string), typeof(SendEmailActivity));
[ValidationOption(ValidationOption.Required)]
public string __ListId
{
get
{
return ((string)(base.GetValue(__ListIdProperty)));
}
set
{
base.SetValue(__ListIdProperty, value);
}
}
public static DependencyProperty __ListItemProperty = DependencyProperty.Register(“__ListItem”, typeof(int), typeof(SendEmailActivity));
[ValidationOption(ValidationOption.Required)]
public int __ListItem
{
get
{
return ((int)(base.GetValue(__ListItemProperty)));
}
set
{
base.SetValue(__ListItemProperty, value);
}
}
public static DependencyProperty __ActivationPropertiesProperty = DependencyProperty.Register(“__ActivationProperties”, typeof(SPWorkflowActivationProperties), typeof(SendEmailActivity));
[ValidationOption(ValidationOption.Required)]
public SPWorkflowActivationProperties __ActivationProperties
{
get
{
return (SPWorkflowActivationProperties)base.GetValue(__ActivationPropertiesProperty);
}
set
{
base.SetValue(__ActivationPropertiesProperty, value);
}
}
#endregion [ Workflow Context Properties ]
What is important here is that the name of the DependencyProperty is equal to the name of the property in the class, appended with Property. Also, the name of the property should be equal to the name of the parameter in the ACTIONS file. Now that we have these properties, we also map the rest of the properties that are more relevant to our solution.
#region [ Custom Workflow Properties ]
public static DependencyProperty ToProperty = DependencyProperty.Register(“To”, typeof(ArrayList), typeof(SendEmailActivity));
[ValidationOption(ValidationOption.Required)]
public ArrayList To
{
get
{
return ((ArrayList)(base.GetValue(SendEmailActivity.ToProperty)));
}
set
{
base.SetValue(SendEmailActivity.ToProperty, value);
}
}
public static DependencyProperty CCProperty = DependencyProperty.Register(“CC”, typeof(ArrayList), typeof(SendEmailActivity));
[ValidationOption(ValidationOption.Optional)]
public ArrayList CC
{
get
{
return ((ArrayList)(base.GetValue(SendEmailActivity.CCProperty)));
}
set
{
base.SetValue(SendEmailActivity.CCProperty, value);
}
}
public static DependencyProperty SubjectProperty = DependencyProperty.Register(“Subject”, typeof(string), typeof(SendEmailActivity));
[ValidationOption(ValidationOption.Required)]
public string Subject
{
get
{
return ((string)(base.GetValue(SendEmailActivity.SubjectProperty)));
}
set
{
base.SetValue(SendEmailActivity.SubjectProperty, value);
}
}
public static DependencyProperty BodyProperty = DependencyProperty.Register(“Body”, typeof(string), typeof(SendEmailActivity));
[ValidationOption(ValidationOption.Optional)]
public string Body
{
get
{
return ((string)(base.GetValue(SendEmailActivity.BodyProperty)));
}
set
{
base.SetValue(SendEmailActivity.BodyProperty, value);
}
}
public static DependencyProperty AttachmentFileNameProperty = DependencyProperty.Register(“AttachmentFileName”, typeof(string), typeof(SendEmailActivity));
[ValidationOption(ValidationOption.Required)]
public string AttachmentFileName
{
get
{
return ((string)(base.GetValue(AttachmentFileNameProperty)));
}
set
{
base.SetValue(AttachmentFileNameProperty, value);
}
}
public static DependencyProperty FromProperty = DependencyProperty.Register(“From”, typeof(string), typeof(SendEmailActivity));
[ValidationOption(ValidationOption.Required)]
public string From
{
get
{
return ((string)(base.GetValue(SendEmailActivity.FromProperty)));
}
set
{
base.SetValue(SendEmailActivity.FromProperty, value);
}
}
#endregion [ Custom Workflow Properties ]
So basically it is more of the same. It connects the parameters from the Action file to our code behind class. So now that we have our properties and our class is fed with the parameters entered by the workflow designer in SharePoint Designer, we can further construct our class to do something useful. The base class System.Workflow.ComponentModel.Activity contains a method called Execute, which is the entry point for our custom activity. To implement, override the method in your custom activity. See the implementation of the method below:
protected override ActivityExecutionStatus Execute(ActivityExecutionContext executionContext)
{
using (var web = __Context.Web)
{
try
{
// Get all of the information we currently have about
// the item that this workflow is running on
var message = BuildMailMessage(web);
// get the attachment if specified
SPFile attachment = null;
try
{
using (SPSite site = new SPSite(AttachmentFileName))
{
using (SPWeb fileWeb = site.OpenWeb())
{
attachment = fileWeb.GetFile(AttachmentFileName);
string name = attachment.Name;
Stream ms = attachment.OpenBinaryStream();
message.Attachments.Add(new Attachment(ms, name));
}
}
}
catch (Exception ex)
{
// log could not find file
Common.WriteFailToHistoryLog(web, WorkflowInstanceId, string.Format(CultureInfo.InvariantCulture, “Unable to add attachment. Could not find or load file ‘{0}’.”, AttachmentFileName));
}
if (!string.IsNullOrEmpty(From))
{
message.From = GetMailAddress(__Context.Web, From);
}
if (message.To.Count > 0)
{
// Send email w/ attachments
SmtpClient smtpClient = LoadSmtpInformation();
smtpClient.Send(message);
// Log entry to Workflow History Log
Common.WriteSuccessToHistoryLog(web, WorkflowInstanceId, string.Format(CultureInfo.InvariantCulture, “Email successfully sent to the following recipients: {0}”, message.To));
}
else
{
// Log entry to Workflow History Log
StringBuilder emailAddressesTo = new StringBuilder();
for (int i = 0; i < To.Count; i++)
{
emailAddressesTo.AppendFormat(CultureInfo.InvariantCulture, “{0}, “, To[i]);
}
// Trim off last comma
emailAddressesTo = emailAddressesTo.Remove(emailAddressesTo.Length – 1, 2);
Common.WriteFailToHistoryLog(web, WorkflowInstanceId, string.Format(CultureInfo.InvariantCulture, “Unable to send email out. No valid user email addresses for the following users ({0}) were found.”, emailAddressesTo));
}
}
catch (Exception ex)
{
// Log entry to Workflow History Log
Common.WriteFailToHistoryLog(web, WorkflowInstanceId, string.Format(CultureInfo.InvariantCulture, “Failed to send email. Error message: {0}”, ex.Message));
}
finally
{
// Cleanup – Dispose of these private properties before exiting
if (__ActivationProperties != null)
{
__ActivationProperties.Dispose();
}
if (__Context != null)
{
__Context.Dispose();
}
}
}
return ActivityExecutionStatus.Closed;
}
To walk through the method, we first get the current web through the Workflow Context. We then use a couple of helper methods to build the mail message (BuildMailMessage), get the SMTP information from SharePoint (LoadSmtpInformation) and get the mail address of a user if it is passed as an account name (GetMailAddress). Please review those methods yourself if needed. Please note the LoadSmtpInformation method. It requests the outbound server address from the WebApplication. Be aware that multiple SMTP settings exist in SharePoint 2010 and that you can specify the outbound server both on server level in Central Admin and for each web application separately. In our case, we use the latter.
private static SmtpClient LoadSmtpInformation()
{
string smtpServer = SPAdministrationWebApplication.Local.OutboundMailServiceInstance.Server.Address;
return new SmtpClient(smtpServer);
}
After we created the message, we try to load the attachment specified by the property. To do that, we use the AttachmentFileName property to open the SPSite where the file resides. We then open the SPWeb and use the GetFile method to load the file into a SPFile object. Finally, we use a MemoryStream to add the attachment to the mail message.
The rest of the method is to assign the From and To mail addresses. You can further expand the activity to also include CC and BCC addresses if you wish.
Register your custom action
Before you can use your custom action, you need to register it with SharePoint in the web.config. We therefore use a feature receiver to do this when activated. Add a feature to your solution and attach a feature receiver. Implement the receiver as follows:
public override void FeatureActivated(SPFeatureReceiverProperties properties)
{
SPWebApplication webapp = (SPWebApplication)properties.Feature.Parent;
UpdateWebConfig(webapp, true);
}
public override void FeatureDeactivating(SPFeatureReceiverProperties properties)
{
SPWebApplication webapp = (SPWebApplication)properties.Feature.Parent;
UpdateWebConfig(webapp, false);
}
private void UpdateWebConfig(SPWebApplication webApp, bool featureActivated)
{
SPWebConfigModification modification = new SPWebConfigModification(“authorizedType[@Assembly=\”Boom.WorkflowActivities, Version=1.0.0.0, Culture=neutral, PublicKeyToken=1f97cfd14d08de08\”][@Namespace=\”Boom.WorkflowActivities\”][@TypeName=\”*\”][@Authorized=\”True\”]”, “configuration/System.Workflow.ComponentModel.WorkflowCompiler/authorizedTypes”);
modification.Owner = “Boom.WorkflowActivities”;
modification.Sequence = 0;
modification.Type = SPWebConfigModification.SPWebConfigModificationType.EnsureChildNode;
modification.Value = string.Format(CultureInfo.InvariantCulture, “<authorizedType Assembly=\”{0}\” Namespace=\”{1}\” TypeName=\”{2}\” Authorized=\”{3}\”/>”, new object[] { “Boom.WorkflowActivities, Version=1.0.0.0, Culture=neutral, PublicKeyToken=1f97cfd14d08de08”, “Boom.WorkflowActivities”, “*”, “True” });
if (featureActivated)
webApp.WebConfigModifications.Add(modification);
else
webApp.WebConfigModifications.Remove(modification);
SPFarm.Local.Services.GetValue<SPWebService>().ApplyWebConfigModifications();
}
This will add or remove an authorizedType node to your web.config file, enabling SharePoint to use the action in SharePoint Designer workflows.
Add safecontrol entries to the package manifest
To ensure that SharePoint will safely load our custom activity, we add a SafeControl entry to the web.config. We do that by overriding the Package.Template.xml to include our SafeControl entry. Also note we use the VS ability to inject the assembly details on build.
<Assemblies>
<Assembly Location=“Boom.WorkflowActivities.dll“ DeploymentTarget=“GlobalAssemblyCache“>
<SafeControls>
<SafeControl Assembly=“$SharePoint.Project.AssemblyFullName$“ Namespace=“$SharePoint.Project.FileNameWithoutExtension$“ TypeName=“*“ />
</SafeControls>
</Assembly>
</Assemblies>
Build and Test
So, the hard work is now done. The last thing to do is have VS build the package and deploy to your environment. Once an IIS reset (or app pool recycle) has been done, fire up SharePoint Designer and connect to your site. Create a new SharePoint Reusable Workflow and see if your custom action is there:
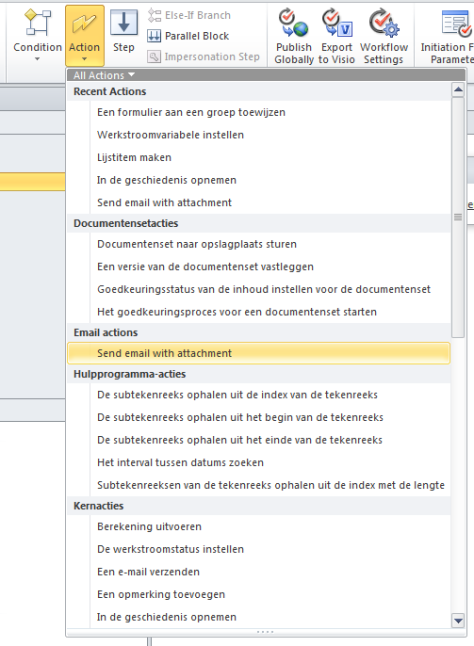
Figure 1: Custom action available
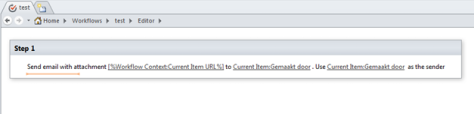
Figure 2: Complete the action parameters
Conclusion
You can do a lot with the reusable workflow abilities in SharePoint Designer 2010. However, the best part is that you can extend the capabilities that the OOB version has, which makes the SharePoint workflows far more likely to be used as they can be tweaked. A definite improvement over SharePoint 2007 where they were as they came.
Have fun building your own!

I have a need to send different documents based on specific criteria, this looks very promising! Thank you.
I wonder, have you found anything related to using the ‘select multiple items’ check boxes to initiate a workflow for multiple items? Like, for example, to send an email to only email addresses selected from a list?
All my custom action experiments behave like the OOtB “Attach File” action. Sure, you can use it one at a time, per item, but not on multiple selections. It’s very frustrating if i have a list of contacts and only want to send a custom email to some of them. I know you could loop through a list in 2008 … but that seems so… annoying… when SP 2010 is supposed to be all about the wonders of custom actions and elegant solutions.
I’m not quite sure if it’s a limitation of SP 2010 or if it’s related to how I’m building the custom actions.
Workflows in SP 2010 relate to a single document, but you can have multiple email adresses I guess as input.
What you would need I guess is some client API code to get all the selected email addresses (nice methods for that) and then feed the selected email addresses as input parameters to the workflow.
Patrick
Hi Patrick,
Thanks a lot for your post. I wrote workflow using this actions but I got this error. Please advice me!
” Failed to send email. Error message: Value cannot be null.
Parameter name: value “
Hi, thank you for your post!! it is great!.
Could you send me the code complete?. there are things that i can´t understand.
Regards.
I noticed that I did not post the code for this solution.
You can download the code here http://www.box.com/s/mob4rcl721vpmnkmu0hx
Oh!! Thanks a lot Patrick!!.
Hi Patrick, I have a problem. When make my solution following your steps and then I deploy this, and when I open the SPD and I access to workflows section I can see this error:
“The list of Workflow actions on the server references an assembly that does not exists. Some actions will not able. The assembly strong name is $Sharepoint.Project.AssemblyFullName$”. Contacto your server……” I was looking at all solution but i don’t found a solution.
What do i doing wrong?
Thanks!
PD: Sorry for my language.
During the build it did not replace the correct assembly name in the ACTIONS file.
Make sure the full assembly name is mentioned there. Then it will work.
Look for ‘$Sharepoint.Project.AssemblyFullName$’
Kind regards,
Patrick Boom | Sr. Consultant
hi,
i have deployed the solution and reset the iis but still action is not visible when i created a new reusable workflow.
regards,
jassi
Have you activated the web application feature for the activity in central admin?
Please check your dll token key is same as one mentiond Cutom.actions and as the one which you are putting into GAC.
I like your Post very much and It is very interesting. I will use this Info to Develop the SharePoint Applications. Thanks for share this valuable Information.
Thanks a lot for your post. I wrote workflow using this actions but I got this error. Please advice me!
” Failed to send email. Error message: Value cannot be null.
Parameter name: value “
Have you been able to fix it as I am receiving the same error, Please do let me know
Thanks very much for the post , what i needed was a sandbox solution which i have been able to convert your solution to.
Thanks once again
You are welcome. Good Luck.
Patrick
I tend not to leave a response, however I read a few of the remarks here Custom Email activity for SharePoint Designer 2010 � Patrick’s SharePoint Blog. I actually do have a few questions for you if it’s okay.
Is it only me or do a few of these remarks look as if they are
coming from brain dead people? 😛 And, if you are posting on additional online
sites, I would like to keep up with anything new you have to post.
Would you make a list of every one of all your social community pages like your Facebook page, twitter
feed, or linkedin profile?
I will update my profile to include some social sites. I do not use twitter though. Have enough to do already 😉
It’s actually a nice and useful piece of info. I’m satisfied that you just shared this
helpful information with us. Please keep us informed
like this. Thank you for sharing.
Thanks.
Kind regards,
Patrick Boom
Hiya! I know this is kinda off topic however , I’d figured I’d ask.
Would you be interested in trading links or maybe guest
writing a blog article or vice-versa? My website covers a lot of the same topics as yours and I think we could greatly benefit from each other.
If you are interested feel free to send me an e-mail.
I look forward to hearing from you! Superb blog
by the way!
Hi thanks a lot for your post , but i get the following error , when i implement the workflow
” Failed to send email. Error message: Value cannot be null.
Parameter name: value “
I hope you will reply, I took a lot of trouble to get it in actions under sharepoint designer because I have no clue about development using visual studio. And finally when everything was done the error, I cant understand what could be wrong
Thanks
i have downloaded your solution and deployed it machine ….but action is not listing
If you had Designer open, you should close it and reconnect. Then it should appear.
Kind regards,
Patrick Boom
Thanks for your post its very helpful. But i have a problem, mail has sent but there was no list item attachment in mail.How can i show attachment in mail?
Hey just wanted to give you a quick heads up and let you know
a few of the pictures aren’t loading properly. I’m not sure why but
I think its a linking issue. I’ve tried it in two different internet browsers and
both show the same outcome.
It’s an amazing post designed for all the internet viewers; they will take
benefit from it I am sure.
Outstanding story there. What occurred after?
Thanks!
Hi there to every single one, it’s truly a pleasant
for me to pay a visit this web page, it contains priceless Information.
Greate pieces. Keep posting such kind of info on your page.
Im really impressed by it.
Hello there, You have performed an excellent job. I will definitely
digg it and individually recommend to my friends.
I am confident they will be benefited from this website.
Have you ever thought about adding a little bit more than just your articles?
I mean, what you say is important and everything.
However think of if you added some great pictures or video
clips to give your posts more, “pop”! Your content is excellent
but with pics and videos, this blog could definitely
be one of the best in its niche. Terrific blog!
You actually make it seem so easy along with your presentation but I to find this topic to be actually something
which I feel I would by no means understand. It kind of feels too complex
and extremely large for me. I am taking a look ahead in your subsequent post, I’ll try to get the dangle of it!
What’s up to every one, since I am in fact eager of reading this web site’s post to be updated on a
regular basis. It consists of fastidious information.
My brother recommended I might like this blog. He was
totally right. This post truly made my day.
You can not imagine just how much time I had spent for this info!
Thanks!
Generally I don’t learn article on blogs, but I would like to say that this write-up very pressured me to take a look at and do it!
Your writing style has been amazed me. Thank you,
quite nice article.
Magnificent beat ! I would like to apprentice while you amend your website, how can i subscribe for
a blog website? The account helped me a acceptable deal.
I had been a little bit acquainted of this your broadcast provided bright
clear concept
Hi there colleagues, its impressive paragraph about tutoringand completely defined, keep it up all the time.
I was recommended this website by way of my cousin. I
am not sure whether or not this submit is written by way of
him as no one else recognize such targeted approximately my problem.
You are incredible! Thank you!
Hey! I just wanted to ask if you ever have any trouble with
hackers? My last blog (wordpress) was hacked and I ended up losing months of hard work due
to no data backup. Do you have any methods
to protect against hackers?
Hey very interesting blog!
my webpage; web page ( Reggie – https://delicious.com/dramaticstem6635 )
Wow! Finally I got a webpage from where I know how to actually obtain helpful facts concerning my study and knowledge.
When some one searches for his required thing, thus he/she
wishes to be available that in detail, therefore that thing is
maintained over here.
This article is actually a nice one it helps new web viewers,
who are wishing for blogging.
Thanks for some other great post. The place else may anybody get that type of info inn
such an ideal approach of writing? I have a presentation subsequent
week, and I am at the look for such info.
You are a life saver Patrick!
I used your code but there were some errors. I modified a little bit and now it is working like a charm!
Thanks!
There are some interesting points in time in this article but I don’t know if I see all of them center to heart. There is some validity but I will take hold opinion until I look into it further. Good article , thanks and we want more! Added to FeedBurner as wellyou have a great blog here! would you like to make some invite posts on my blog?