In one of my previous posts (located here), I discussed the Unique Document ID feature that can be enabled on all document libraries within the site collection. In that post, I also mentioned that it was strange that the E-mail a Link button on the ribbon then still uses the actual url of the document, instead of the virtualized unique url of the document. Why would you have a unique url to a document that you cannot easily send?
So, I decided to add my own button to do so. In the end, it is not that difficult, but a lot of new concepts of SharePoint 2010 can be caught in this single venture. To name a few, Extending the Ribbon interface, the Client Object Model (javascript) and Custom Actions. So, without further due, let us continue.
The Approach
We need to accomplish several things to make all of this work.
- Add a button to the ribbon in the context of a document library.
- Assign a custom action to execute when the button is clicked.
- Obtain the selected item from the document library.
- Query the server to get the unique document url of the selected document
- Open a mail message containing a description (subject) and the unique url.
- Finally, make the button context ‘aware’, so that it is only enabled when a document is selected.
So, let us start with the first part, add a button to click.
Add a button to the ribbon
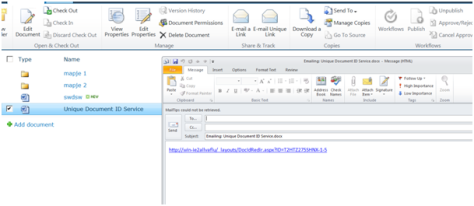
Let us examine the end state first. We would like a button to be added to the ribbon next to the original E-mail a Link button, like in the image below:

The ribbon is composed using a XML definition that contains three logical parts: Tabs, Groups and Controls. These are hierarchical, meaning that Tabs contain Groups and Groups contain Controls. A tab (for example Documents) or group (for example New) can be static (always available) or contextual.
In our case, we want to add our button (control) to the Share & Track group on the Documents tab. This marks our Location, which we will see later when we start coding. To be exact, the location of our control will be Ribbon.Documents.Share.Controls, where Controls is the container of the group Share on the tab Documents that is located on the ribbon. Sounds logical enough right?
So, when we want to add something on the ribbon (where we can also create our own tabs, groups and contextual controls), we first need to find out the location. Based on the convention, it would be easy enough to figure out, but sometimes the naming is not exactly equal to that displayed in the UI. The following msdn article mentions all default locations for the ribbon, but an excessive overview is beyond the scope of this blog. http://msdn.microsoft.com/en-us/library/bb802730.aspx
Let’s start coding 😉 Open Visual Studio 2010 (this can also be done with VS 2008, but you must then build the package yourself. Visual Studio has far better build-in support for SharePoint 2010. Create a new empty SharePoint project and give it a name, in my case I use Boom.EmailUniqueLinkButton.

Enter the url of the site you want to debug to and use deploy as a farm solution option. Once done, right click the created project and add a new item to the project. Use the Empty Element type and give it a meaningful name, in my case EmailUniqueLinkButton.

Right click again on the project and add SharePoint “Layouts” Mapped Folder. This folder will contain the resources that will be used by our button, in our case the javascript. Also notice that a subfolder with the name of the project is automatically added beneath the Layouts folder. If not, you should add it manually. Right click the feature beneath the feature node (feature 1) and select rename. Rename it to a meaningful name, in my case Boom.EmailUniqueLink. If desired, you can change the default title in the properties also. The default scope of our feature is Web. We will keep it at that scope. When done, our solution will look like below image.

The elements.xml file will contain the xml definition needed to add our button to the ribbon. Open the file and add the following node to the xml (as child of Elements):
<?xml version="1.0" encoding="utf-8"?>

<Elements xmlns="http://schemas.microsoft.com/sharepoint/">

   <CustomAction

       Id="Ribbon.EmailUniqueLink"

       Location="CommandUI.Ribbon"

       RegistrationId="101"

       RegistrationType="List">

       <CommandUIExtension>

          <CommandUIDefinitions>

          </CommandUIDefinitions>

          <CommandUIHandlers>

          </CommandUIHandlers>

       </CommandUIExtension>

   </CustomAction>

</Elements>
This needs some clarification. Beneath Elements, we define a CustomAction, which has the following attributes:
- Id – This will uniquely identify our action, can be anything, but is usually something that could easily be related to the ribbon.
- Location – This indicates where we want to add our custom action, in our case to the CommandUI.Ribbon. Mark though that this is not yet the location of our button! That will follow later.
- RegistrationType – Although marked in the documentation as optional, it is not. RegistrationType indicates the type to which this action is bound. Could be List, FileType, ContentType or ProgId. In out case, it is List.
- RegistrationId – Although marked in the documentation as optional, it is not. RegistrationId indicates the type id to which this action is bound. In our case the list type id (101 = Document Library). In case it was a content type, this would contain the content type id.
Below the CustomAction element, we can define a CommandUIExtension, which contains a CommandUIDefinitions and CommandUIHandlers. The former specifies what will be added, the latter specifies what happens when the control is used (in our case clicked).
Include a CommandUIDefinition node below CommandUIDefinitions. Add an attribute Location. The location will dictate where the control will be added. In our case, Ribbon.Documents.Share.Controls._children. Note the ‘_children’ behind Controls, which indicates to SharePoint that a new child should be added to the Controls collection. Now, finally we can add our button. Include the following xml beneath the CommandUIDefinition node.
<Button

   Id="Ribbon.Documents.Share.EmailUniqueLink"

   Command="Ribbon.Documents.Share.EmailUniqueLink"

   Sequence="15"

   Image16by16="/_layouts/$Resources:core,Language;/images/formatmap16x16.png"

   Image16by16Top="-16"

   Image16by16Left="-88"

   Image32by32="/_layouts/$Resources:core,Language;/images/formatmap32x32.png"

   Image32by32Top="-128"

   Image32by32Left="-448"

   Description="Sends the unique link to the document by email"

   LabelText="E-mail Unique Link"

   ToolTipTitle="E-mail Unique Link"

   ToolTipDescription="Sends the unique link to the document by e-mail"

   TemplateAlias="o1"

/>
Before we get to the attributes, I wanted to reuse the image that was used for the original E-mail button. Partly because it would save me work, but more over because I am terrible in creating images and icons 😉 Secondly, I needed to check the Sequence, which defines the order in which the controls are displayed on the ribbon. As I wanted my new button to appear next to the original one, the sequence should be higher than the first, but lower than the following control. To check this, we can take a look at the default Ribbon definition located at 14\Template\Global\XML\CMDUI.xml. Search for Ribbon.Documents.Share.Controls, which defines the controls in the group we want to add to. There you can find the original EmailItemLink button that is the basis of our control.
<Button
Id=“Ribbon.Documents.Share.EmailItemLink”
Sequence=“10”
Command=“EmailLink”
Image16by16=“/_layouts/$Resources:core,Language;/images/formatmap16x16.png”
Image16by16Top=“-16”
Image16by16Left=“-88”
Image32by32=“/_layouts/$Resources:core,Language;/images/formatmap32x32.png”
Image32by32Top=“-128”
Image32by32Left=“-448”
LabelText=“$Resources:core,cui_ButEmailLink;”
ToolTipTitle=“$Resources:core,cui_ButEmailLink;”
ToolTipDescription=“$Resources:core,cui_STT_ButEmailLinkDocument;”
TemplateAlias=“o1”
/>
Three attributes are very important to notice. Sequence, Command and TemplateAlias. The sequence of the original E-mail button is 10. The next control in the list (AlertMe) has a sequence of 20. We therefore choose 15 as the sequence for our control, so that it would still be possible to squeeze items in to both left and right in the future. The Command attribute defines the name of the command that is executed when clicked. We will define that later. The TemplateAlias defines the template for handling scaling and sizing. In order for our control to act like the other controls in the group, we have to choose the same template. Finally, we copy over the image references so that we can use the images that came out of the box. So let us now discuss all the attributes:
- Id – Marks the unique id of our control. Usually, the convention is to follow the location naming followed by a meaningful name of the control, in our case EmailUniqueLink.
- Sequence – The order in which the control should be shown. In our case 15.
- Command – The name of the command to execute. Again, could be anything, but has to be unique, which is why I again use the naming convention.
- ImageXX – The several image attributes define the images to use for both 16 px and 32 px and their locations. I used the same as the original one taken from the CMDUI.xml file.
- Description – Describes the control.
- LabelText – Defines what is shown beneath the button in the UI.
- ToolTipTitle/ToolTipDescription– Shows the title and description when hovering over the button.
Now we have the button defined, but unless we define the action, it will do nothing. So, add the following xml snippet in the CommandUIHandlers section.
<CommandUIHandler
Command=“Ribbon.Documents.Share.EmailUniqueLink”
CommandAction=“javascript:EmailUniqueLink();”
EnabledScript=“javascript:EnableEmailUniqueLink();”
/>
Note that the Command attribute equals that defined in the button command attribute. In the CommandAction attribute, we define the action to be taken when pressed. In our case, we call a javascript function called EmailUniqueLink that will do the hard work for us later on. You can also define the function and related code inline in this attribute, but I rather have it in a separate .js file, both for easy debugging and maintenance. The final attribute here is called EnabledScript which defines the script that determines whether the button is enabled or not. The called function has to return a boolean. We will define the function later.
We have now defined the button and the action to be taken, but not yet the location of the javascript functions that will be called. Right click the Boom.EmailUniqueLinkButton folder in the layouts folder of the solution explorer and add a .js file. You can call it anyway you want, just remember the name. I call it Boom.EmailUniqueLinkButton.js. We will talk about the code in there later on. Go back to the Elements.xml file. Add another CustomAction element beneath the Elements node.
<CustomAction
Id=“Ribbon.Documents.Share.EmailUniqueLink.Script”
Location=“ScriptLink”
ScriptSrc =“/_layouts/Boom.EmailUniqueLinkButton/Boom.EmailUniqueLinkButton.js”
/>
Again, the Id marks the unique identifier for this action. In the Location attribute, we specify ‘ScriptLink’ to indicate that it concerns an external file. In the ScriptSrc attribute, we specify the location of our just created javascript file.
Your Elements.xml file should now look like this:
<?xml version=“1.0“vencoding=“utf-8“?>
<Elements xmlns=“http://schemas.microsoft.com/sharepoint/“>
<CustomAction
Id=“Ribbon.EmailUniqueLink”
Location=“CommandUI.Ribbon”
RegistrationId=“101”
RegistrationType=“List“>
<CommandUIExtension>
<CommandUIDefinitions>
<CommandUIDefinition
Location=“Ribbon.Documents.Share.Controls._children“>
<Button
Id=“Ribbon.Documents.Share.EmailUniqueLink”
Command=“Ribbon.Documents.Share.EmailUniqueLink”
Sequence=“15”
Image16by16=“/_layouts/$Resources:core,Language;/images/formatmap16x16.png”
Image16by16Top=“-16”
Image16by16Left=“-88”
Image32by32=“/_layouts/$Resources:core,Language;/images/formatmap32x32.png”
Image32by32Top=“-128”
Image32by32Left=“-448”
Description=“Sends the unique link to the document by e-mail”
LabelText=“E-mail Unique Link”
ToolTipTitle=“E-mail Unique Link”
ToolTipDescription=“Sends the unique link to the document by e-mail”
TemplateAlias=“o1“/>
</CommandUIDefinition>
</CommandUIDefinitions>
<CommandUIHandlers>
<CommandUIHandler
Command=“Ribbon.Documents.Share.EmailUniqueLink”
CommandAction=“javascript:EmailUniqueLink();”
EnabledScript=“javascript:EnableEmailUniqueLink();“/>
</CommandUIHandlers>
</CommandUIExtension>
</CustomAction>
<CustomAction
Id=“Ribbon.Documents.Share.EmailUniqueLink.Script”
Location=“ScriptLink”
ScriptSrc =“/_layouts/Boom.EmailUniqueLinkButton/Boom.EmailUniqueLinkButton.js“/>
</Elements>
We have now defined our button and performed the necessary wiring to make it respond to actions. Now let’s look at the code that will use the Client Object Model to get the unique document id link. Don’t worry, we are almost there 😉
Using the Client Object Model to get List Item properties
SharePoint 2010 adds the Client Object Model to our toolbox, which we can use through native code, Silverlight or javascript. (ECMAScript). Discussing the inner workings of the client object model is beyond the scope of this blog. We will only use the model to get the properties of the list item.
Many of the internet examples cover the Silverlight or native side of the client object model. I will use the ECMAScript method to get the properties of the list item and use it to generate the mail message.
So let us take a look at the javascript code. Open the added js file and include function bodies for the methods defined in the Elements.xml file, like below snippet.
function EmailUniqueLink() {
}
// Delegate that is called when server operation is complete upon success.
function onQuerySucceeded(sender, args) {
}
// Delegate that is called when server operation is completed with errors.
function onQueryFailed(sender, args) {
}
// Method to enable/disable the e-mail unique button on the ribbon.
function EnableEmailUniqueLink() {
}
// This method will contain most of the code needed to request the unique url to the document
The first method contains most of the code. The onQuerySucceeded and onQueryFailed methods are delegates that are needed because the client object model in javascript works asynchronously. The last method is needed to specify when the button is enabled.
When using the client object model, we always have to obtain the client context first. The client context contains the proxies that are used to connect to the server. Second thing we need to know is that the client object model works with batches. This means that we load the object we want returned in the context and then execute it first. Include the following code snippet in the EmailUniqueLink method.
// First get the context and web

var ctx = SP.ClientContext.get_current();

this.web = ctx.get_web();// Get the current selected list, then load the list using the getById method of Web (SPWeb)

var listId = SP.ListOperation.Selection.getSelectedList();

var sdlist = this.web.get_lists().getById(listId);
In this code snippet, we first obtain the client context and load the web. Then we use the SP.ListOperation.Selection object to get the current list. This will return the GUID of the list, which we then use to get the list reference through the web object. Please mark though that the web and list objects are not populated yet. We again use the Sp.ListOperation.Selection object to get the current selected item in the list, which will return an object containing an id property. Using that id, we can request the list item from the list. To have the list item populated and thus get our unique document id, we need to load it in the context and then execute the query. As said, this can only be done asynchronously. This is done by calling executeQueryAsync and pass the success and fail methods respectively. Another thing to note here is that we use this when we need to access the variable outside the method. Include the following snippet in the onQuerySucceeded method.
// Request url by using the get_item method. It will return the Url field type, which has a Url property.

var url = this.listItem.get_item('_dlc_DocIdUrl').get_url();

// Request the name of the document.

var title = this.listItem.get_item('FileLeafRef');

// Open a new e-mail in the default mail program.

window.open('mailto:?subject=Emailing%3A%20'+ title + '&body=' + url);
Once the asynchronous call is done, we can access the properties of the listitem by calling the get_item() method passing the name of the field you wish to return, in this case the ‘_dlc_DocIdUrl‘ that contains the unique link. Because that returns a SPFieldUrl type like object, we call get_url() to get the actual url. To complete the mail message, we also request the name of the file and then call the mailto: to open the message in an e-mail client.
In this case, we requested the entire listitem object from the server. We can also specify which properties to return so we can limit bandwidth use and increase performance. The way to do this is by adding the desired properties as parameters in the load method of the context, in our case _dlc_DocIdUrl and FileLeafRef, like below snippet.
// Only request name and DocIdUrl

ctx.load(this.listItem, '_dlc_DocIdUrl', 'FileLeafRef');
I prefer to load the entire object during debugging, so I can inspect the entire object (using developer tools >IE7).
// Get the currently selected item of the list. This will return a dicustonary with an id field
var items = SP.ListOperation.Selection.getSelectedItems(ctx);
var mijnid = items[0];
// Request the list item from the server using the getItemById method. This will load all properties.
// If needed, one could pre-request the fields to be loaded to preserve bandwidth.
this.listItem = sdlist.getItemById(mijnid.id);
// load the item in the context for batch operation.
ctx.load(this.listItem);
//Execute the actual script on the server side. Specify delegates to handle the response.
ctx.executeQueryAsync(Function.createDelegate(this, this.onQuerySucceeded), Function.createDelegate(this, this.onQueryFailed));
The failed body is not of much interest, although you could add code there to shown that it went wrong and why, as it gets the arguments containing the error passed. Add the following snippet to the failed method.
alert('failed ' + args.toString());
That is all that is needed to create the e-mail and send the unique url. Last method only enables the button when there is actually an item selected. Add the following snippet to the EnableEmailUniqueLink method:
// request number of selected items.

var items = SP.ListOperation.Selection.getSelectedItems();

var count = CountDictionary(items);

// only return true is a single item is selected.

return (count == 1);
Above is quite self-explanatory I guess. I get the number of selected items and only return true if the number of selected items equals 1. The entire javascript file should now resemble the following:
/*

====================================================================================================================

File: Boom.EmailUniqueLinkButton.js

Description: Contains supporting javascript functions to allow the unique link of a document to be sent by e-mail

Date:19-04-2010

Author: Patrick Boom

====================================================================================================================

*/


// This method will contain most of the code needed to request the unique url to the document

function EmailUniqueLink() {

   // First get the context and web

   var ctx = SP.ClientContext.get_current();

   this.web = ctx.get_web();

   // Get the current selected list, then load the list using the getById method of Web (SPWeb)

   var listId = SP.ListOperation.Selection.getSelectedList();

   var sdlist = this.web.get_lists().getById(listId);

   // Get the currently selected item of the list. This will return a dicustonary with an id field

   var items = SP.ListOperation.Selection.getSelectedItems(ctx);

   var mijnid = items[0];

   // Request the list item from the server using the getItemById method. This will load all properties.

   // If needed, one could pre-request the fields to be loaded to preserve bandwidth.

   this.listItem = sdlist.getItemById(mijnid.id);

   // load the item in the context for batch operation.

   ctx.load(this.listItem);

   //Execute the actual script on the server side. Specify delegates to handle the response.

   ctx.executeQueryAsync(Function.createDelegate(this, this.onQuerySucceeded), Function.createDelegate(this, this.onQueryFailed));

}


// Delegate that is called when server operation is complete upon success.

function onQuerySucceeded(sender, args) {

   // Request url by using the get_item method. It will return the Url field type, which has a Url property.

   var url = this.listItem.get_item('_dlc_DocIdUrl').get_url();

   // Request the name of the document.

   var title = this.listItem.get_item('FileLeafRef');

   // Open a new e-mail in the default mail program.

   window.open('mailto:?subject=Emailing%3A%20' + title + '&body=' + url);

}


// Delegate that is called when server operation is completed with errors.

function onQueryFailed(sender, args) {

   alert('failed ' + args.toString());

}


// Method to enable/disable the e-mail unique button on the ribbon.

function EnableEmailUniqueLink() {

   // request number of selected items.

   var items = SP.ListOperation.Selection.getSelectedItems();

   var count = CountDictionary(items);

   // only return true is a single item is selected.

   return (count == 1);

}
Only thing left to do is compile and deploy the code. If you followed all steps correctly you should see a button next to the E-mail a Link button and when you click it (and you have the Document ID feature enabled in the Site features), an e-mail should open with the unique link in the body, like below image:
That’s it, watch the fruit of all you hard labor. In this post, we covered quite some material, like customizing the ribbon and using the client object model to examine the selected list item. Hope you like it! You can download the entire VS solution from here. Leave a comment if you have a couple of minutes. Much appreciated!
See ya…

Amazing detail just what is needed and quite easy to follow, thanks for posting.
Thanks for your kind words. Glad it is of use to you.
Cu
Patrick
Great example, and Patrick, how could I access the server side code from the ribbon button. Do you have example?
Ken, there are multiple ways of accessing server side code from the ribbon. One example could be found in my article about the dynanmic menu button. I used the ICallbackEventhandler interface, but the postback interface will also work.
Dynamic menu on the ribbon
This is a great post, thanks for sharing this Patrick. I am a little new to this and the bit I’m missing is where to put the script and how to tell SharePoint to use it. Can you point me in the right direction?
Thanks
Hi Chris,
I placed the javascript file in the Layouts directory in ist own separate folder. It is always good practice to use sub directories in the layouts folder to keep customizations separate from the OOB code.
So in this case, I have placed it in the \Templates\Layouts\Boom.EmailUniqueLinkButton\*.js
The Custom Action tag above associates the script with the action to perform.
Kind regards,
Patrick
Hi Patrick,
I found your article very helpful and very clear to follow, however I could not complete it. I was wondering if you could please give me a hand, I am getting the error ‘Failed Column ‘_dlc_DocIdUrl’ does not exist. It may have been deleted by another user.’ I am working on a solution to attach multiple documents in an email and I need the URL. my code is something like yours.
function EmailUniqueLink() {
var context = SP.ClientContext.get_current();
this.web=context.get_web();
var listId = SP.ListOperation.Selection.getSelectedList();
var list = web.get_lists().getById(listId);
var items = SP.ListOperation.Selection.getSelectedItems(context);
for(i in items){
var itemSelected=items[i];
alert(itemSelected.id);
this.listItem=list.getItemById(itemSelected.id)
context.load(this.listItem,’_dlc_DocIdUrl’, ‘FileLeafRef’); // I had to declare the properties otherwise the exception would have told me ‘the object or property has to be initialized’
context.executeQueryAsync(
Function.createDelegate(this,this.getWebSuccess),
Function.createDelegate(this,this.getWebFailure)
);
}
}
function getWebSuccess() {
alert(‘List Item: -‘+this.listItem.get_item(‘_dlc_DocIdUrl’).get_url()); //here is when I got the exception
}
function getWebFailure(sender, args) {
alert(‘failed ‘ + args.get_message());
}
Thank you and I do really appreciate any ideas about what I am doing wrong or what I am missing out
Nanojg,
Looks OK at first glance. Have you enabled the unique ID feature on the site collection? Maybe an open door, but it is not enabled by default.
Hi Patrick,
Thank you for your response, I have enabled it and it stills says ‘Failed Column ‘_dlc_DocIdUrl’ does not exist. It may have been deleted by another user.’, It does not find the URL, is there any other way of getting the full URL of the Document? or am I missing something else?
thanks in advance
Thank you Patrick, I worked it out, I am using another field EncodedAbsUrl
Nanojg,
Glad you have found a way, although I am still curious to what happened here. If you find out, please let me know.
It might be that the search configuration is not complete, as this feature relies on search.
Anyway, glad it now works.
Patrick
On some Windows7 machines with IE8, clicking the button fires up a new browser instance with a mailto link like this
mailto:?subject=Emailing.msg&body=http://site/_layouts/DocIdRedir.aspx?ID=TEST-9-36
the page says: “Navigation to the webpage is canceled”, but the email link fires up.
This isn’t a problem on all machines and there are no obvious settings in internet options that are causing this.
Any ideas?
Guess it has to do with the security settings and the zones. Have not tried it though and not encountered it so far.
Hey thanks a lot for this nice post. It rocks
Thanks! You are welcome and glad you liked it.
hi,
would you please tell me how can send multiple links like i want to send multiple links at once, article is great. is this solution send multiple links if not so how can i do that using your article.
thanks
Great web site. Lots of useful info here. I’m sending it to a few buddies ans additionally sharing in delicious. And certainly, thanks on your effort!
Thanks for the kind words.
Hi there colleagues, its enormous piece of writing regarding tutoringand entirely defined,
keep it up all the time.
You are welcome.
Patrick
Wow, fantastic blog format! How lengthy have you ever been running a blog for?
you make running a blog look easy. The full look of your website is
magnificent, as well as the content!
Many thanks, it is not so hard as it looks, although finding the time to write continuously provides a challenge.
That said, thanks a lot!
Kind regards,
Patrick Boom
Hello just wanted to give you a quick heads up. The words in your content seem to
be running off the screen in Chrome. I’m not sure if this is a formatting issue or something to do with web browser compatibility but I thought I’d post to let you know.
The layout look great though! Hope you get the issue fixed soon.
Kudos
Please let me know if you’re looking for a article writer for your weblog. You have some really good articles and I think I would be a good asset. If you ever want to take some of the load off, I’d really like to
write some articles for your blog in exchange for a link back
to mine. Please blast me an e-mail if interested. Cheers!
Just blasted you an email.
Hey would you mind letting me know which webhost you’re working with? I’ve loaded your blog in 3
different browsers and I must say this blog loads a lot quicker then most.
Can you recommend a good hosting provider at a
honest price? Cheers, I appreciate it!
This blog runs on WordPress.
Hello my family member! I wish to say that
this post is amazing, nice written and come with almost all
significant infos. I would like to look more posts like this .
My pleasure. Thanks for the comment!
Patrick Boom
I read this post fully regarding the difference of most up-to-date and
previous technologies, it’s remarkable article.
Howdy! I realize this is somewhat off-topic however I had
to ask. Does building a well-established blog like yours require a
large amount of work? I am brand new to operating a blog
however I do write in my journal every day. I’d like to start a blog so I can share my own experience and views online. Please let me know if you have any kind of recommendations or tips for new aspiring blog owners. Thankyou!
Hi,
No worries, glad to answer. Operating the blog requires investment of time that depends on your goals.
The goal of my blog is not to share all the news, but to share stuff I encounter on a day to day basis.
As such, much of the material is provided by itself, that only needs polishing and writing the article. I spend roughly an hour or 3-4 to write one.
The platform provides much of the needed functionality, so no real maintenance is needed. You do need to invest time in answering and reviewing the comments made by other though. I write my articles just using word that can post it directly online. I only then need to polish it up to correct some formatting.
So if you want your blog to provide value to others, you need to invest time and effort 😉
Kind regards,
Patrick Boom
We stumbled over here different web address and thought I might check things out.
I like what I see so now i’m following you. Look forward to finding out about your web page again.
Good day! Do you know if they make any plugins to assist with
Search Engine Optimization? I’m trying to get my blog to rank for some targeted keywords but I’m not seeing very good results.
If you know of any please share. Kudos!
It’s very easy to find out any matter on web as compared to textbooks, as I found this post at this site.
First of all, I want to point out that dieting and exercises are best methods for fat loss.
Aping Schwarzenegger, well, not as the ‘Governator’ but as
the ‘muscled machine’ has been a traditional phenomenon that has been in practice
among the ‘bulk yearning’ youth of the past three decades.
Protein is needed daily for lean muscles and they need to be taken daily in small amounts.
Thank youu for the god writeup. It in fact was a amusement account it.
Look advanced to far added ageeable from you! However, howw could we communicate?
Hi woud yoou mind sharing which bloog platform you’re using?
I’m plannig to start my own blog in the near
future buut I’m having a hard time deciding between BlogEngine/Wordpress/B2evolution and Drupal.
The reason I ask is because your design seems different then most
blogs and I’m looking for something cpmpletely unique.
P.S Apologies for getting off-topic but I had to ask!
Fantastic beat ! I wish to apprentice while you amend your website, how can i subscribe for a blog website?
The account aided me a acceptable deal. I had been tiny bit acquainted
of this your broadcast provided bright clear idea
I got this web site from my pal whho shared with me concerning this site and now thijs timee I am browsing this website and
reading very informative articles here.
Hi! This post couldn’t be written any better! Reading through this post reminds me
of my good old room mate! He always kept talking about this.
I will forward this page to him. Pretty sure he will have a good read.
Thank you for sharing!
I am sure this post has touched all the internet visitors, its really really good post on
building up new website.
I am genuinely delighted to read this weblog posts which contains plenty of valuable data,
thanks for providing these kinds of statistics.
Howdy! I know this is kinda off topic but I’d figured I’d ask.
Would you be interested in exchanging links or maybe guest writong a blog post or vice-versa?
My website covers a lot of the same topics as yours and I believe wee could greatly
benefit from each other. If you arre interested feel free to shoot me an email.
I look forward to hearing from you! Great blog by the way!
I’ve been browsing online more than 4 hours today, yet I never
found any interesting article like yours. It is pretty worth enough for me.
In my view, if all web owners and bloggers made good content as you did,
the net will be a lot more useful than ever before.
Great site you have here.. It’s hard to find high quality
writing like yours these days. I honestly appreciate people like you!
Take care!!
Nice answer back in return of this question with real arguments
and telling the whole thing regarding that.
This, in turn, will lessen sexual excitement and pleasure, and may even reduce sexual function.
Flick your tongue firmly around the clit while making up and down motions.
The bottom line when it comes to masturbation is that it
is normal and healthy.
Stretch every other day and make sure that you really are getting
into the stretching, and not just go through the motions.
You can even ask them to stunt with you or throw standing back-tucks
to counts.
I’m not certain where you’re geting your information,
however good topic. I needs to spend a while learning more or
working out more. Thanks for fantastic information I used to bbe searching for this information for my mission.